Sic Itur Ad Astra – Thus The Way To The Stars : 144 years of astronomy
If you can see this message then you are using a browser (probably Internet Explorer) which does not support the international web standards used by the LAS website and many others. Click here for an example of how the site should look.
Please consider using an alternative browser - especially if you are on Windows XP which only supports the outdated Internet Explorer 8 browser - such as Mozilla Firefox or Google Chrome which do have support for these web standards. As well as not supporting modern features and web standards, old versions of browsers - especially Internet Explorer - can expose your computer to security risks. The Browse Happy website has a list of the latest versions of all major browsers, including Internet Explorer (but remember Windows XP only supports up to IE8!)
If updating/changing your browser is not possible, do not panic - all of the LAS website is still available to you and we are working to make the layout compatible with outdated browsers.
Below are some of the images we’ve been sent from last night’s Star Party at Wirral Country Park.
As we receive more, the gallery below will update.
If you have images you’d like to add, please get in touch!
You can contact us in any of several ways: In the comments at the bottom of this page, via our forum, with our Contact forms, via flickr not to mention Twitter and Facebook!
If none of those suit, there’s good old fashioned e-mail (but if you don’t already have our direct e-mail address, you’ll need to make an initial contact via one of the other methods so we can give it to you).
In case you’re worried about sharing your images, be assured that you retain all credit for and copyright on your images – the only thing we ask is that we are allowed to display them, with attribution to you of course!
Just a message of thanks, once again to all the LAS Members who helped with last night’s Wirral Star Party, which was attended by approx 125 members of the public.
The weather tried to crash the party with rain and cloud, but we did get some clear spells, to enjoy Jupiter, and lots more.
Special thanks to Wirral Ranger Dave, who gave up his night-off to open the Wirral Country Park visitor centre for the event.
The Campaign to Protect Rural England‘s Dark Skies division and the British Astronomical Association have partnered with National Astronomy Week 2014 to run Star Count 2014.
From the website:
By taking part in our Star Count you will be helping us to find out which part of the country has the darkest skies where the most stars can be seen. The results will help us highlight the problem of light pollution which is spoiling the natural beauty of the night sky.
Taking part is easy:
On a night between 26th February 2014 and 8th March 2014, using just your eyes count the number of stars you can see within the constellation of Orion and submit your results!
You don’t need a telescope or binoculars, and you could win a prize.
It has recently come to our attention that e-mails sent from us to Virgin Media e-mail accounts are going directly to their customers’ “Spam” folder, which by default is not immediately visible.
If you use Virgin Media’s e-mail services (including those inherited from Telewest/blueyonder and NTL), you may not have received e-mails sent from our systems.
This applies to e-mails such as:
New account registrations
Password reminders
Notifications to forum threads
Any e-mail from liverpoolas.org addresses
Unfortunately we do not know when this issue began, only that it was at least several weeks ago, and possibly much longer.
Please note that it must be via their webmail – if you are using POP3 via an e-mail client (e.g. Outlook, Thunderbird, etc.) then you will NOT be able to see the missing e-mails AT ALL.
Once you have logged in via webmail, you can show the “Spam” folder by doing the following:
On the left of the screen, you should see a button labelled “Compose”.
Below this you will see various folders, starting with “Inbox”, “Starred”, “Important”, etc.
At the end of this list, you should see the word “More” – click this.
The e-mail account’s “Spam” folder should now be visible.
Click on this and you should find any e-mails sent by us from the last 30 days (anything older will already have been automatically discarded by Virgin Media).
Regards,Liverpool Astronomical Society website team
Society members, including our own LAS Supernova Search team, have been imaging the recent supernova (now designated SN 2014J) in M82 / NGC 3034 (also known as the Cigar Galaxy).
At a distance of approximately 11½ Light Years (roughly 68,000,000,000,000 miles!), it is the closest supernova to us since 1993 (SN 1993J).
Although it now seems to be past its peak, currently at magnitude 11.2 and getting fainter, it’s still visible in very large binoculars, or telescopes of about 4″ aperture and above.
Supernova 2014J in M82 / NGC 3034, imaged on 19th January 2014 by the LAS Supernova Search Team, led by Dave Thomson
Although it is 12 million light years away, M82 is considered to be a next-door neighbour of the Milky Way. Indeed, this is the nearest supernova to Earth since SN 1993J was famously observed 21 years ago. The relative proximity of the blast makes it an attractive target for astronomers to study. Light curves from previous supernovas of this type suggest that the fireball could continue to brighten for the next two weeks.
Tuesday 7th & Wednesday 8th January 2014 at Stargazing Live, Jodrell Bank
Once again for the third year in a row, the LAS was asked to participate in the very successful Stargazing Live events run by the BBC at Jodrell Bank. Adult Members and Young Astronomers from our society took part in the “Back to Earth” portion of SGL in the studio at Jodrell Bank. We had 2 exciting evening and met some of the stars from the Tuesday and Wednesday shows.
The Liverpool Astronomical Society would like to wish all our members and visitors a very Merry Christmas and happy New Year, and of course clear skies!
If you’re new to astronomy and you’re thinking of buying your first telescope then this article should help you
Shiny new telescopes do look very desirable and despite a levelling of price in recent years a decent beginners scope is still around £150.
A telescope does not always have to be the first thing to consider purchasing when you get into this great hobby. Experienced amateur astronomers often recommend starting with 10×50 binoculars if you’ve a fixed budget of under £100. Binoculars are easy to use and transport. If you eventually decide astronomy is not for you then binoculars are always useful to have and your money wouldn’t have been wasted.
You should also consider purchasing a decent book to guide you around the night sky and a plastic planisphere to help you locate the constellations. If you’d like more techbased aids then having a decent planetarium program for your computer or tablet is very useful. I have tried a few and have stuck with Sky Safari (Mac and mobile devices only) but other options such a Stellarium and Red Shift are worthwhile too. There are plenty of apps for your tablet or mobile.
So you’re going to purchase your first telescope and you want to know how to pick the right one for you. Be careful astronomy is addictive!
Generally don’t buy a telescope from anyone advertising huge magnifications and has glorious colour nebula pictures displayed on the telescope boxes. If you do visit department stores or TV shopping channels for telescopes then make sure you know what you’re doing! Remember, when it comes to telescopes, size does matter and it’s more important to understand the light gathering qualities of the optical tube assembly (OTA) than any alleged magnification. You need the right advice from a specialist astronomy dealer such as Telescope House, Astronomia, Opticstar, Widescreen and Green-witch. Or go along to a local astronomy society observing session and see telescopes galore for yourself. Liverpool AS society members are very approachable and will be happy to help with advice.
I have bought several telescopes since the mid-90’s. My first was an Orion Optics Newtonian 8” reflector followed by the early Meade ETX90, then the goto ETX90. I sold all those and have now ended up with a Celestron SCT 9.25” and a Borg 77mm Achromatic refractor. I’m very happy with my choices. More than just mirrors and lenses – there are 3 major elements to deciding on a suitable telescope;
OTA – the optical tube assembly including finderscope. Size and type
The mount – dobsonian, GEM or altaz, motorised, Goto computer or not
The tripod or pillar – portable or permanent
More about those within the article and you can’t discuss telescopes without mentioning eyepieces so see within the article for eyepieces too.
The best telescope for you is the one you’ll make most use of. Do your research before you purchase, not after! Some good websites later in this article will help you further. Everything in this article is my personal opinion so comes with a warning that you should research yourself and draw your own conclusions!
Most decent branded telescopes will give you many years of enjoyment and they will give you good images of planets and deep sky so don’t get too obsessed with the type of tube etc, it ends up mostly being personal choice with a bias to your favourite astronomical objects! Whatever you decide to buy, remember that astronomy is not an ‘instant‘ hobby and requires developing skills such as basic understanding the stars and constellations, learning how to actually observe through a telescope and learning how to make best use of your new telescope – including that goto computer control if your telescope has one!
The OTA – Optical Tube Assembly types
Telescopes come in many varieties, sizes and shapes so plenty to think about. Let’s start with the 3 main types of optical tube assembly;
The Reflector (also known as Newtonian),
The Refractor
The Cassegrain or SCT
All very different to each other and with different characteristics. The bigger the primary mirror or objective lens, the more light gathered by the OTA. This means fainter objects will be brighter and can be magnified more. It’s not all about magnification, more about that later.
Newtonian Reflector
Diagram showing how a Newtonian reflector telescope works
This kind of telescope tube was invented by Isaac Newton, hence the name Newtonian. The tube of a Reflector (above) has a primary concave mirror at one end and a secondary flat mirror at the other. The eyepiece is located towards the top of the OTA. This kind of OTA gives very good value vs mirror diameter so typically larger primary mirrors would be affordable to you with a limited budget. The f/ratio of
these kind of OTA’s are usually known as ‘fast’ being around F3 to F5. Fast f/ratio means better light gathering abilities. So the characteristics of a Newtonian reflector are better suited for faint deep sky objects. The secondary mirror does slightly reduce the amount of light hitting the primary mirror. 5 – 6” reflectors are a good beginners scopes, not too big and would cost you around £150-£250. Reflectors are
usually easy to set up and are better for Messier and other deep sky objects. The bigger the mirror diameter the brighter the image and a larger 16” diameter reflector will cost around £1,600 to £2,000 but give you fantastic deep sky images.
The Refractor
Diagram showing how a refractor telescope works
In the diagram, the light enters the tube from the left and is refracted by the objective lens to a focal point. It is then usually reflected and focussed to the eyepiece. The eyepiece being at the end of the OTA.
Lower priced refractors can suffer from poor optics so avoid plastic optics completely. Optical lenses can vary enormously in quality. So avoid those £50 ‘toy’ refractor telescopes.
The high quality ones will cost between £800 and £1500 for a small 70-80mm diameter objective. These are referred to as APO (Apochromatic) refractors. A 90mm Takahashi will set you back about £2,000 and that’s just for the OTA! I have seen refractors that cost £25,000!
However do not despair as there are lower priced alternatives that also produce very good images starting from about £150 for 70-80mm objective lens. If you’ve a bigger budget then there are mid-range refractors that offer excellent optics for half the price of an APO. At around £450 for 70-80mm you’ll have a fine refractor with excellent images.
Decent refractors give sharp clear images as they do not have a secondary mirror in the light path so they are really good for planets and brighter objects. In simple terms the more you pay the more advanced the primary lens will be and the better the image.
Small refractors of 80mm and less are very portable and give good image views. F/ratio tend to give a wide field of view, the image can be magnified up depending on lens quality and seeing conditions. Smaller refractors are good wide field instruments but can also give lovely planetary views.
Cassegrain, Catadioptrics and SCT’s
Diagram showing how a Cassegrain telescope works
This type of OTA is known as a Catadioptrics or Cassegrain or SCT and are amongst the most popular type of telescopes owing to their performance and relative portability. Light enters from the left and is reflected off the primary mirror to a secondary. This then aims the light through a central tube and a hole in the primary mirror to the eyepiece. The light path is “compressed”. The eyepiece is at the back of
the OTA. This type of design gives longer focal lengths and higher f/ratios of f10 which means higher magnification. These type of OTA’s will have narrower field of views, give excellent images of planets and will give large magnification – but then I’m biased as these are my favourite scopes!
SCT’s are very good for star clusters, planets, Messier and deep sky in general but with a higher f/ratio they have a narrower field of view meaning wider field objects may not fit and a focal reducer might be required at some point. In my opinion Cassegrains are the best all round telescopes and the nearest you’ll get to an “all purpose” scope – but they’re a little more expensive.
Meade and Celestron are the main manufacturers of SCT style OTA’s and there are other manufacturers too. This type of telescope has a corrector plate at the front of the tube assembly and this is the difference between a Schmitt Cassegrain and a Maksutov Cassegrain. The Maksutov has a concave shaped corrector plate to minimise the size of the central mirror.
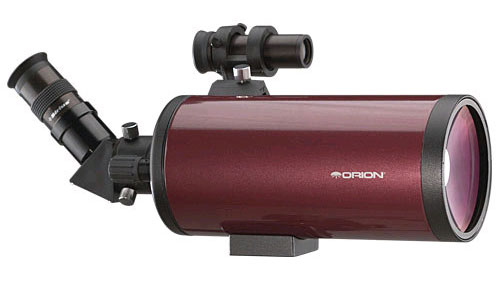
Schmidt-Cassegrain Optical Tube Assembly (OTA)
Maksutov-Cassegrain Optical Tube Assembly (OTA)
Maksutov Cassegrain design tube on the right and the Schmitt Cassegrain on the left
SCT’s are portable by design and also very adaptable for permanent observatory use with the larger OTA’s. Meade and Celestron make 8” to 16” models usually mounted on an U-shaped altaz mount called forked mount. 8” aperture models are nice and portable and fit in a car quite easily. Up to 10” is still portable but anything over that starts to get a bit big. I like the size of my 9.25” diameter OTA as a reasonable size to
use and transport.
Smaller models of Maksutov type from 90mm are obviously extremely portable. One of the best images I ever had of Jupiter was through my old Meade 90 ETX so whilst the image of the fainter objects won’t be as bright as a larger scope, don’t rule out 90mm apertures. Indeed, I had taken it to Spain on holiday several times and the views of the Andromeda galaxy and Whirlpool galaxy were superb.
Smaller Masutov-Cassegrain telescopes are usually fork mounted and many have motor control or goto computers – more about those later. Prices start from around £350 for a typical Celestron Nextstar 90 with goto computer, alt-az mount and decent tripod – plus usually at least 1 eyepiece. Bigger SCT’s will cost you between £1500 and over £3000 so avoid those unless you’re a real enthusiastic amateur observer!
So what does focal length and f/ratio actually mean?
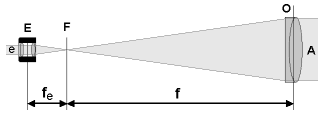
As with camera lenses, OTA’s have focal length and f/ratio characteristics. The focal length is simply the length from the primary mirror or lens to the point were the light is focussed into a point. f in the diagram A is the diameter of the primary mirror or lens ie the aperture. f/ratio is focal length divided by the aperture in mm. ie f/A
So my Celestron has a focal length of 2350mm and an aperture of the primary mirror 235mm making it an f/10 scope (f/A = 2350/235). Simple!
More significant is why it’s important. Lower f/ratio’s have “faster” light gathering systems. So f4 is faster (faster meaning it gathers more light) than slower f10 and an f10 telescope will have a smaller field of view than an f4 so for the same eyepiece an f/10 will produce a larger image. Aperture is the other major component of light gathering abilities – bigger the aperture, the better the light gathering abilities of the OTA. Try this link for more information on telescope design, focal length and f/ratio http://www.chuckhawks.com/telescope_focal_length.htm
Understanding the focal length and f/ratio helps you make decisions about what the scope will be best for and what kind to buy. Faster f/ratio’s tend themselves to fainter deep sky objects whereas slower f/ratio’s tend themselves to planets and brighter deep sky objects such as globular clusters. When purchasing or using eyepieces in your telescope knowing the focal length of your OTA system allows you to calculate the magnification a particular eyepiece will give you. For instance my Celestron SCT has a focal length of 2350m so a 12.5mm eyepeice (fe in the diagram) will produce x188 times magnification. Putting the same eyepiece in my refractor with a focal length of 500mm produces x40 magnification. Magnification is OTA focal length/eyepiece focal length (2350/12.5=188mag, 500/12.5=40mag). So focal length
is important, equally so is aperture for light gathering abilities, f/ratio describes the relationship between the two elements.
Eyepieces
Eyepieces design, types and manufacturers is a complete article in itself. When you’re starting off in astronomy the main consideration is to have at least 2 eyepieces of different focal lengths so you can alter the magnification of the image. A x2 Barlow lens would be useful too, this magnifies x2 any eyepiece inserted into it. Typical sizes to start off with are 25mm and 12mm. A good rule of thumb is no more than x50 magnification for every 1 inch (25mm) of aperture. There are many different eyepiece types and manufacturers, stick with the telescopes’ brand to start with and you should be fine. When you’re more experienced then look at the higher quality manufacturers such as Televue (www.televue.com) and the variety of eyepiece types.
I’m going to quote from the Scottish Highlands Astronomical Society telescope basics website…… http://www.spacegazer.com/
quote “Although eyepieces usually consist of more than one lens, they can be regarded optically as a single lens. In many books on telescopes, you will read that the eyepiece “magnifies the image which has been focussed by the objective lens”. This description, although theoretically correct, is a bit vague. It would be much better to say that the purpose of the eyepiece is to put the expanding light rays
beyond the focal point back into a bundle of parallel rays again, in order to reconstruct the image. For that purpose, the eyepiece needs to be placed exactly at the right distance from the focal point. Looking at the diagram above, you would expect this distance to be the same as the focal length(fe) of the eyepiece (E) itself, which is indeed the case.” unquote.
Telescope Mounts
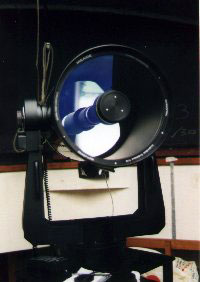
This is me with my Celestron 9.25” SCT, mounted on a Vixen GP German Equatorial Mount (GEM) with a Skysensor goto hand computer and an Orion Field Tripod. An equatorial mount is one type of mount Telescope OTA’s can be attached to.
2 basic mount types are available today Alt-Az and equatorial. Either type can have computer controlled goto’s. Alt-Az is so called as it moves in Altitude ie up or down and Azimuth ie left to right. A particular kind of Alt-Az is very popular with Amateur telescope makers, the Dobsonian mount. Alt-az mounts are also popular with SCT manufacturers such as Meade and Celestron who use fork mounts.
A Meade LX90 on an Alt-Az mount
A Newtonian Optical Tube Assembly (OTA) on an equatorial mount
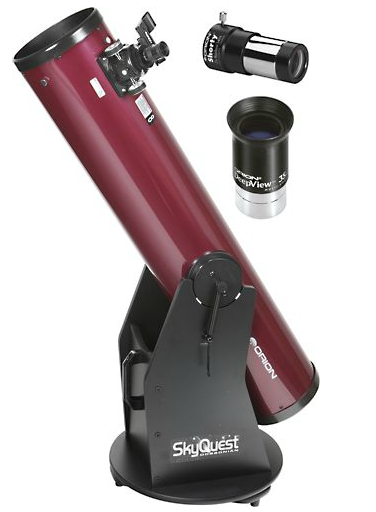
A Dobsonian Alt-Az mount from Orion Optics
Which mount do I choose?
The mount is pretty much personal choice based on price, usability and how “hi-tech” you want to go. A simple Dobsonian mount with a large aperture Newtonian reflector OTA of say 10” is a very simple instrument to use and most of your spend goes on the OTA mirror. Perhaps not for children due to it’s size but good value adult size instrument. Spending your money on aperture size instead of a more expensive OTA type or hi-tech mount means you can quickly and easily set up and point your 10” Dobs up to the sky and start observing. Typically a 6” dobs will cost around £200-£300 up to about £1,200 for a 10” mirror size. Dobsonians as they are called takes you to the world of amateur telescope makers. Take a look at the TROK telescope, a 30” home made dobsonian built by some LAS society members. http://datscope.wikispaces.com/30+inch+TRO+Telescope
Altaz mounts generally take on the form shown in the diagram below left. They are typically simple to set up and use. The Meade and Celestron U-shaped altaz fork mounts are some what different but still the same basic design. The higher tech Meade and Celestron Altaz mounts shown below right have altitude and azimuth motor control or goto computer controlled.
A simple Alt-Az mount
Left is a diagram of a simple Altaz mount.
Right is the Liverpool Astronomical Society’s 12” Meade LX200 located at the Leyton Observatory, Pex Hill. This image clearly shows the U-shape altaz mount of this type of telescope.
Altaz mounts are generally lower priced compared to equatorial mounts but can also be hi-tech. Altaz mounts have a problem pointing the telescope at the zenith. Goto technology means the Meade and Celestron type Altaz mounts can track the celestial object under observation as the night sky moves from East to West. Of course the sky isn’t moving the telescope is compensating for the
movement of the Earth by slowly turning the Altitude and Azimuth motors by the same rate. This does produce a step type movement albeit very small steps!
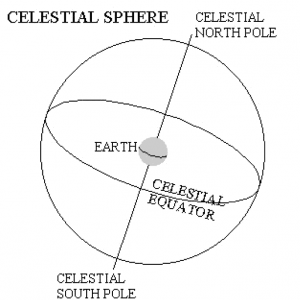
Diagram showing Celestial Sphere with Equator and poles
Equatorial mounts differ in that they require more setup. In northern England one axis is tilted to 53 degrees (your location latitude) and pointed at the North Pole in the sky. It is now called a Right
Ascension RA axis. What you are doing basically is setting up the RA axis of the telescope to be parallel to the north/south pole line. As the earth rotates, the RA motor of the mount moves at the same rate
keeping the celestial object in the eyepiece view. So an equatorial mount can keep in sync with the object you’re observing by moving the RA axis. The other axis is called the Declination axis. The RA & Dec
produce a smooth movement and very suitable for astrophotography. One other advantage is the object stays in the same orientation and doesn’t rotate in the eyepiece as an Altaz mount does. Pretty key for long exposure photography! On a personal note, I believe that an equatorial mount is more accurate when it comes to tracking the sky and slewing in goto mode over an Altaz mode.
Left is a diagram showing how a correctly set up equatorial mounted telescope has the RA axis parallel to the north/south line.
Right is a typical equatorial mount, a Vixen GP mount to be precise
Above is a typical equatorial mount – manual with slow motion. After a few attempts and practice, setting up your scope will be a simple task. Do it during the daylight before attempting an evening’s observation.
So to summarise telescope mounts, out of the 2 types the Alt-az type tends to be simpler and less hi-tech such as Dobsonian mount, meaning the cost of the telescope goes on the mirror size. The Meade and Celestron U-shape forked mount however is an ideal match to their SCT telescopes making for a portable hi-tech instrument from 90mm up to 16” with well designed motors and/or GOTO computer
control. Equatorial mounts need a bit more setup, the RA axis must be pointed north at the pole star. The RA axis also needs to be parallel to the north/south pole line so a latitude adjustment is also needed. Very accurate alignment will keep the object in the eyepiece for as long time if the mount tracks and is used for astrophotography. They can also be simple manual movement or manual slow motion control. German Equatorial Mounts like the Vixen or other similar mounts can be easily motorised or computer control added – very often as a later purchase. The equatorial mount however takes a little more getting used to than an Alt-az type.
Motorised or goto
More to think about with mounts is whether you want to manually move the telescope, use a motor to move & track or go for a full computerised goto mount.
Again I’ll quote my own experiences, my Celestron has an equatorial Vixen GP mount with a goto computer control that drives a motor on each axis of RA and Dec (Right Ascension and Declination). So takes a bit of time to set up with polar alignment of the RA axis and then setting up the computer control by aligning it to 3 bright stars. Once that is completed then I can simply key in “Jupiter” or M31 and away it goes! Whereas my small refractor has an Alt-az design mount with manual slow motion movement so this is simple and fast to setup and easy to use (modern day term being a grab and go scope!!).
Tripods and Pillars
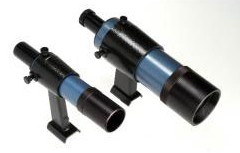
Just as important as the mount or the Optical Tube Assembly is the tripod or pillar. A good solid tripod goes a long way to eliminating vibration. In my photo earlier, the Orion Optics field tripod is a good solid setup – and it’s portable. A suitable tripod is a compromise between portability and a solid base to mount your telescope. Pillars these days tend to be permanent fixtures in observatories. Orion Optics used to make and supply a pillar with their Newtonian telescopes but these days they seem to include tripods. Tripods are more convenient for transporting. Always check whether a tripod ‘flexes’ and vibrates as this is a good sign of the build quality.
A typical telescope pillar
A typical Celestron Newtonian system from David Hinds with a typical tripod
In summary…
So now you’re armed with all the explanations and jargon and are probably even more confused! Here’s my advice for a beginners telescope.
Try to contact your local society for practical advice or an observing visit
Go to a recommended telescope dealer
Decide on what you want to observe
Decide on your budget and this does reflect on your final decision.
Recommend you don’t buy a telescope for less than £130. Don’t forget to ask for a good deal with extra things thrown in.
Go for a 5-8” reflector and a simple mount to start with, maybe an equatorial motorised or goto. Priced between £150 and £300 (more if goto included)
Or go for a small Cassegrain type on an Alt-az mount with computer control if your budget stretches to £350-£450
Be patient with your new toy and give yourself time to learn the new skills required
Popular brands are Skywatcher, Meade, Celestron and Orion
BBC Stargazing Live is back on our screens (7th to the 9th January 2014), and astronomical societies all over the country will be hosting events throughout the month. We at the Liverpool Astronomical Society have three events arranged:
Astronomical equipment suppliers and optical equipment specialists Astronomia have asked us to let LAS members know that they will be attending the upcoming North-West Astronomy Festival 2013 on the weekend of Sat/Sun 26th/27th October 2013.
Astronomia have kindly offered to bring along any items which LAS members would like to have a look at in person, whether to buy or simply inspect. If you wish to request an item, please contact Adele on 01306 640714 as soon as possible.